Wednesday, November 25, 2015

Giving Thanks Blog Hop + A Woodgrain Tutorial

We at STAMPlorations are having a very special blog hop in honor of Thanksgiving! 


I've got SO much to be thankful for this year. 2015 has been such a monumental one but here are some things I'm EXTRA thankful for:

>I just found out I'm going to be a new auntie again!
>I have amazing, supportive family
>My boyfriend is pretty much the better than Nutella. Yep. 
He's that awesome.
>I reached over 200 blog followers in my first year of blogging!! And you all constantly make my day!!

This week, I particularly felt like getting messy in the craft room. I've been doing a lot of clean-looking cards lately and all of my bits, bobs, and texture-making things have been glaring at me. 

I decided to try out one of those glarers - my NBUS Weathered Wood STAMPlorations stencil

But how to go about creating a realistic looking wood grain? I didn't know, so I just started trying things and found a really, really perfect combo! Which, of course, I'm gonna share with you!


http://damselofdistressedcards.blogspot.com


Step One


Swipe Vintage Photo Distress Paint downwards, letting the dabber create variegated streaks. Then Spray with Antique Linen Distress Spray Stain, filling in any white spaces. Dry completely. 

Step 2


Position your stencil and tape down. Use an embossing pad to dab embossing ink through the stencil. Do not rub in circles as this will ruin the print AND your inkpad. 

Step 3


Add a dark brown embossing powder. I love this one, which is sooooo old and an inheritance from my grandma. It's actually called rust and dries to a wicked cool texture. 

Heat it all up and voila! Pretty easy, realistic looking woodgrain!

And here's what I did with it!


Lotsa layers! I added some aged pattern paper, as well as some roses from the Blossom Overture stamp set and also put together a sentiment from the same set. I backed the focal panel with some gauze to soften up the overall design. 

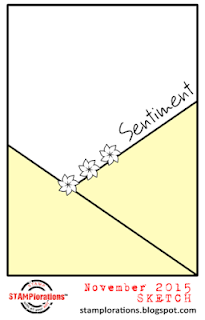
I took my layout from the current Retro Sketches challenge:  


I'm also linking this up to Mixed Media World - Anything Goes. I'm also sending it over to Simon Says Monday - Thank You Challenge.

Woot! I'm amazingly happy that I got some mixed media goodness going on again. And I'm so pleased to have been part of such an awesome hop that celebrates the things we all have to be thankful for. 

Please hop along with us! AND you could win a prize! There are some awesome Thank You cards to view!

Tuesday, November 24, 2015

Guest Designing at Cardz 4 Guyz - Winter Fun Card

Ya know, usually North Dakotans are the ones being buried under feet of frigid snow before the rest of the country even considers the 4-letter word's existence. After seeing winter storm Bella (really? We're naming winter storms now... According to the Google that's been going on since 2011, who knew?)  dump oodles of snow on my neighbors to the south, I went outside and pretended to make celebratory snow angels in my not-so-white neck of the woods. We're not the first ones!

However, the lack of snow has made it decidedly more difficult to get into the Christmas spirit. Hence my lack of Christmas cards. Hence my impending panic.

Luckily, Cardz 4 Guyz came to my procrastinating rescue this week by forcing me to create a card with the theme "Fun in the Snow".


I started by coloring some texture paste with dark blue gelatos (I did a tutorial on this earlier in the week) I wanted to play with some Christmas goodies that have been stuck in their dungeon since this time last year, so I pulled out my Tim Holtz Holiday Knit stencil.


Oooooo! Sparkly - After I schhhhmeared the texture paste through the stencil, I naturally had to add some microfine glitter. #notsorry!
 
Then, since the background was already Holtzian, I decided to play with my NBUS Tim Holtz Syled Woodland stamp set. It's so folksy and I thought the deer would look soooooo cuuuuuute with this card.
 
 
As you can see, I sprinkled the background with a little bit of Chipped Sapphire Distress Spray Stains and then added some blue metallic floss behind the reindeer before rounding out the look with a sentiment.


He's so merry! Or unimpressed... I can't tell which. Let's go with mysterious - He's so mysterious!!
 
Anywho - that's my card for today, and I hope you'll consider going to play along in the Fun in the Snow challenge over at Cardz 4 Guyz this week!
 
 
My colors came from the Merry Monday challenge currently underway - Blue and White with Texture! I'm also going to enter it into the Mixed Media Monthly challenge - Texture!


Thursday, November 19, 2015

BS Sessions - Gelatos Tutorial 101


Welcome, Friendly Friends to the
third installment of the BS Sessions!


What are the BS Sessions? Well Samantha knows how to work a marker like nobody's business and Becca loves to get messy with mixed media. We both wanted to learn the other person's crafty secrets so we're going to ask one another a question on the last Thursday of the month. Becca will provide you with some amazing Mixed Media techniques and Samantha will show you some tips and tricks about coloring! We'll both provide our followers with a little tutorial, because if we have these questions - our followers might too!

_______________________

Which brings me to this month's question, asked by Sammy:


How do you use gelatos? What are some different things you can do with them?


Gelatos! I love them! Next to Distress Inks, they're probably my very favorite crafty supply because there is SO much you can do with them. 

Things to know about Gelatos:
>They have the consistency of soft crayons
>You don't have to be gentle with them. Definitely scribble away!
>They are reactive with water

Some of the things I'm going to show you have been published on my blog before, but I thought it would be helpful to compile a whole list of them right here. 
_______________________

Making Backgrounds with Gelatos

If you're looking for quick and easy way to make a background that's also super stunning, look no further. 


One thing I would HIGHLY suggest when using this technique is to paint the cardstock with a thin layer of gesso first. Gesso seals the tiny holes of the cardstock, so the gelatos will blend together more easily, rather than being absorbed right away. 


Background on the left is made without gesso - 
background on the right is with gesso. 
As you can see - background two is much better. 
I scribbled on some gelatos and blended them together with my fingers. I wanted it to look distressed, so I wiped away a little bit of the background with a baby wipe.

To see how this background got turned into a card - check out this blog post.  
_______________________

Making Drips With Gelatos

As I said earlier, gelatos are reactive with water, which means you can do some really cool techniques! One of my favorites is making drips. For this technique, it's almost essential to base your cardstock with gesso, or the drips will not go as far and will not blend well. 


To achieve this effect, scribble gelatos across the top (in this case I used three shades of purple and a gold). Next, use a mini mister to spritz the gelatos strip with water and hold it vertically so that the water can drip down the paper. Add more or less water based on the effect you want to achieve. 

To see the card I made with this panel, check out this blog post.
_______________________

Watercoloring with Gelatos

You can use gelatos exactly like you use watercolors in a couple of different ways. 

You can either draw directly onto an image and then paint over it with a watery paintbrush or waterbrush pen to blend:


Or, for more precise watercoloring, you can scribble some gelatos onto a clear acrylic block (or any surface) and then mix the colors with a little water and pick up with a paintbrush.


_______________________

Using Gelatos to Color Texture Paste, Gel Medium, or Gesso

Gelato shavings can be used as a coloring agent by mixing with any wet or liquid product. 


Shave some of the gelato stick into the texture paste (or gesso, gel medium, etc) and mix thoroughly. Obviously, the more of the stick you use, the deeper the color tone will be. I only used a little bit of the dark blue, so I wound up with a lovely pale blue in the end. 

__________________________________


These are just of the few ways to use gelatos! There are so many possibilities! You can use them to color almost anything in a quick but stunning way! 

If you'd like to see all of the projects I've made with gelatos, you can check out my gelatos project library

_______________________

Now - if you're interested in improving your coloring skills, make sure you head on over to Sammy's blog 
because she's answered my question:


What the heck does a blender pen do? Do I need one?


Wednesday, November 18, 2015

My new stamp set is released today! STAMPlorations Caffeinated Christmas!

Fa la la la LATTE!!! I told you yesterday when I made an adorable hot cocoa holder that my new stamp set would be released today. 

And I wouldn't lie to you, so without further ado - I present to you:


I know I JUST designed another coffee-themed sentiment stamp set, but Shery asked if I would double-down and do a Christmas theme one with... wait for it.... PUNS! So, what we're saying is that it's the trifecta of perfection because it combines all of my great loves: Coffee - check! Christmas - check! Puns - check, check, check! 

This set is so fleeping cute! You can use it on cards, like so:


Dontcha love the plaid? Totally mixed and matched it to try to create a warm and inviting comfy Christmas feel. 

It's also good for making adorable little Christmas gifts like so:


I shared this in yesterday's blog post - with design specifications if you want to recreate it! 

And last but not least - it's PERFECT for holiday tags for little gifties that you want to give:


All of the sentiments for these projects came from my Big Grins by Becca Cruger - Caffeinated Christmas set. The adorable coffee cup stamps are from the Sketchy Coffee Cups set. 


Now for the exciting news!! We're giving away a free set of the Caffeinated Christmas to one lucky commenter!!! 

Wanna know how to win one? (Of course you do, silly.)

How the mini release hop works:
  • Go comment on the STAMPlorations blog.
  • Visit the designers' blogs and comment on their featured project(s).
  • Commenting closes on Friday, November 20, 11:55 p.m. Pacific (GMT-8).
  • We'll randomly select a winner of the stamp set from comments left on all the blogs and announce it on Sunday, November 22.

By the way, Caffeinated Christmas is now available in the STAMPlorations shop and for one week only (until November 25), it's 10% off!

Thanks for popping by and checking out my designs. I still sort of feel like I'm in a dream that I get to do something so cool and all of you amazing people have been SO supportive. I have a LOT to be thankful for. 

Tuesday, November 17, 2015

STAMPlorations challenge - Newsprint and a Sketch

Christmas is in the air!!!! Ok, ok, I know we're still a whole week away from Thanksgiving, but I couldn't resist pulling out the green and red and making a whole lotta merry in my craft room this weekend. And I've got a super adorable project to share with you all - a hot cocoa holder! 


Sometimes when I look at a sketch challenge, I see something completely different and when I looked at the latest STAMPlorations challenge, I instantly envisioned this 
little cocoa holder. I think I'm totally going to make up a bunch of these for my coworkers for Christmas. 


Beee teeeee dubs, you don't have to use the sketch, we also have a theme, too! So you can use either the sketch, or the theme or both! Options!

But back to the cocoa holder!

Here are the specs! 


Cut a sheet of paper at 12'' and 5 1/2''. Score lengthwise at 4'' and 8'' and then score the bottom 1/2''. Fold on the score lines. Then cut the bottom 1/2'' of each of the side flaps off, leaving the scored 1/2'' of the center panel. Cut the panels at the angle you desire. 

Fold bottom 1/2 score line up and glue the right panel to it. Finally, glue the left panel over the top of that. Finished! 

By the way - the sentiment stamp is a sneakity peekity at my brand new stamp set that comes out tomorrow! Check back in tomorrow for the FULL reveal along with other crafty holiday gift projects. I also used Blooming Buds by Dee's Artsy Impressions
I'm also going to send this over to the following challenges:
Pile it On - Any Holiday/Celebration
The Challenge - look at this adorable cocoa-themed image!

Sunday, November 8, 2015

STAMPlorations November Challenge - Newsprint and Sketch

ACKCKC!! I was away traveling in New England and totally forgot to schedule my post for the STAMPlorations November challenge - Now I'm in for it! 

This month at STAMPlorations, we're playing around with newsprint (that's our theme) and we also have a rad sketch. How our challenge works is that you can use either the sketch OR the theme OR both. (CHOICES! woo!) You can also use any brand of stamps that you want. (MORE choices! Woot!) And there's some great prizes, too! 

I looked around my craftroom for some newsprinty paper, and my eyes landed on an brown paper packaging bag. Not newsprint, but that's what my brain wanted to play with. 


I decided to make my own layered flowers and started by stamping some little blooms from the VIGNETTE: Eclectic Florals set. I fussy cut them out and layered them together in various ways, using a brad to hold them all together - and act as a pretty shiny thing for the center. 


Next I found a center panel that I wanted to use and pulled out my Dreamweaver glossy black embossing paste through the Botanical Lush ARTplorations stencil.


Then I used one of my favorite techniques to add funky texture - I heated it up with my embossing gun! When you heat it, it begins to bubble and crack. 


Oooooooooooooooooooooooo!

And here it is - all together!


Sentiment is from the Blooms Sketches set and paper is from Graphic 45. 

So play along with either the theme or the sketch


I'm also going to send this card over to the following challenges: 
Little Red Wagon - Mix It Up


Tuesday, November 3, 2015

Guest Designer - Cardz 4 Guyz - Feel Better

Up here in North Dakota, cold and flu season is in full gear. Sniffles and coughs can be heard 'round the clock! I haven't come down with anything yet, but being surrounded by miserable kiddos and grumpy adults has been swell. Poor things!

So when I was asked to guest design at Cardz 4 Guyz for the month of November, and found out the first challenge theme was "Feel Better" I immediately... well... felt better. Now I could color away the problems, right?!


Look at that little guy... isn't he just adorable? In a very-ill sort of way... adorable. ;)
This guy is a digital stamp from Mo's Digital Pencil called Needs Mummy. You may remember that I just did a vintage Christmas card with one of their images, too. I sort of am in love with how cute their stuff is.

http://cardz4guyz.blogspot.com/2015/11/challenge-95-hope-u-feel-better-soon.html 

 
Sketch Saturday opened their competition up to ANY past sketch from their gallery to participate in the challenge this week, and so I chose one that caught my eye. Sketch Number 238 if you're counting.
 
I used a mountain of Spectrum Noir alcohol markers to get him colored up just right.

 
See - a literal mountain!
 
But in the end, he turned out oh-so-cuuuuute!
 
 
The sentiment is from STAMPlorations Blossom Overture. If somebody doesn't feel better after seeing all this cuteness in one location, welp... they're probably a goner.
 
I'm also going to send this over to the following challenges:
Try it on Tuesday - Lots of Layers